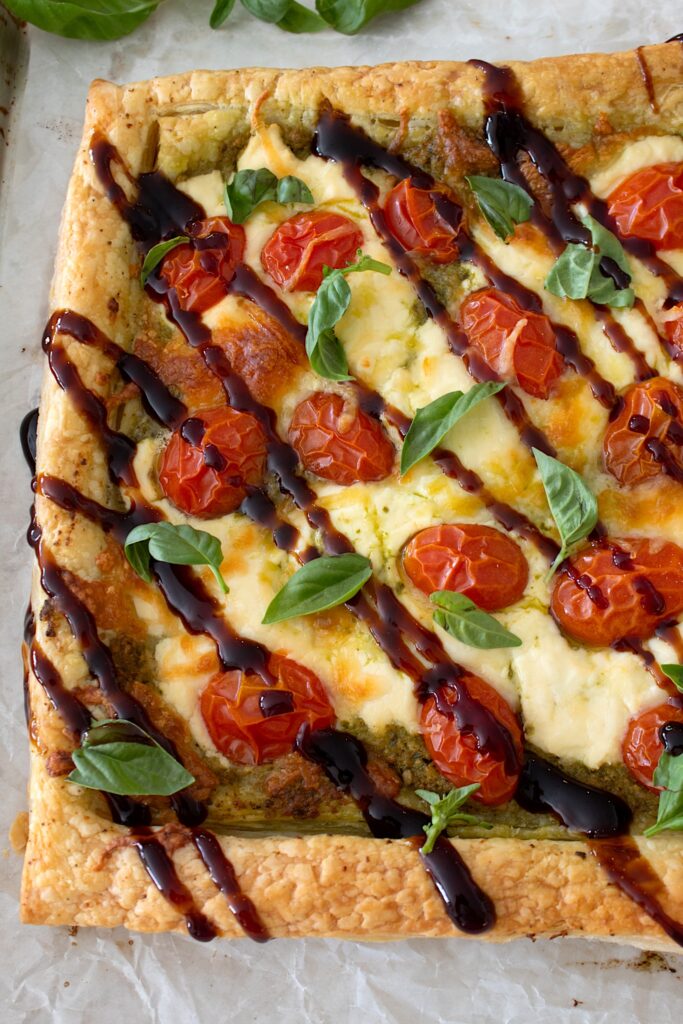
Puff Pastry Tart (with pesto, ricotta & tomatoes)
Puff pastry is such an easy medium to work with. This tart is made with a puff pastry base, and topped with pesto, ricotta, and tomatoes. Once it’s done baking, drizzle it with some balsamic glaze for a restaurant quality, easy on the cook, aesthetically pleasing appetizer. Delish!
Puff Pastry Tart Recipe
There are a million ways to cook a puff pastry tart. I love This version because A) it’s beautiful and B) the flavor is outstanding. Start by making a square in the interior of the puff pastry dough. This will help keep a nice even edge on the outside of the tart. Then, add pesto.
TIP: Assemble this right on parchment paper on a sheet pan. No nonstick spray needed.

Puff Pastry Tart Filling
I use store-bought pesto, but you can make your own if you have a bounty full of basil. I find that Costco has the best pesto. You can find it refrigerated in the cheese aisle. It’s low on processed ingredients, and it has such a fresh flavor. The fact that it’s refrigerated makes it that much better in my book, because it means it’s fresh!
Cut a square in the middle of the puff pastry, which will help separate the filling from the crust as it bakes. Then, fill in the center with pesto and spread it around.

Tart Toppings
Add in a few scoops of ricotta cheese, along with mozzarella and cherry tomatoes cut in half. You can use either mozzarella or ricotta. I do like the rich sweetness of ricotta combined with the salty pesto so I encourage you to use ricotta cheese! A little bit of shredded mozzarella helps stabilize the tart and it makes it all brown up so nicely in the oven.

Baking Puff Pastry Tart
Bake the tart for about 20 minutes or until it’s golden brown. Let it sit for about 5-10 minutes to cool before cutting it.
I like to cut this into small squares to serve right on the parchment paper. Rustic, easy and pretty!

Garnishing, Serving & Storing
- I love to garnish this with balsamic glaze. It adds so much flavor and it all goes together so well! I also added some fresh sprigs of basil for color.
- I like to serve this as an appetizer and when I do serve it, I’ll just leave it on the parchment paper. It would be really pretty on a grazing board, too!
- If you have leftovers, store them in the refrigerator in a lidded container for up to 3 days. If you want to reheat this, simply air fry on reheat for a few minutes until warmed throughout.

More Puff Pastry Recipes
Puff pastry is such an easy medium to use for appetizers. It thaws quickly, you can stuff it with a million different combinations. Here’s my favorite recipes using puff pastry!
- Ham and Cheese Pinwheels
- Asparagus Tart
- Puff Pastry Cheese Straws
- Spinach Puffs
- Apricot Puff Pastry Bites
- Goat Cheese Puff Pastry Bites
- Baked Brie in Puff Pastry

If you made this recipe, share it on social media!
Tag us @GigglingFork on Instagram or use #GigglingFork. We love to see your recipes!
Cheers to easy, and pretty appetizers! – Rachel

Puff Pastry Tart (with pesto, ricotta & tomatoes)
Equipment
- large sheet pan (18×26)
- Parchment Paper
Ingredients
- 1 10×15 inch sheet of puff pastry
- 3 tbsp pesto
- 3/4 cup whole ricotta cheese
- 1/2 cup cherry tomatoes (halved)
- 3 tbsp shredded mozzarella
- 1 tsp olive oil
Garnishes
- balsamic glaze
- fresh basil
Instructions
- Preheat oven to 375 degrees fahrenheit. Line a sheet pan with parchment paper.
- Place puff pastry on parchment paper on sheet pan. Cut an interior square in the puff pastry to create a divide between filling and crust.
- Spread pesto on interior square of puff pastry. Add ricotta cheese in large rustic scoops, and lightly spread it out. Press halved cherry tomatoes into the ricotta. Sprinkle shredded mozzarella over ricotta and halved tomatoes. Brush exterior crust with olive oil.
- Bake for about 15-20 minutes, or until puff pastry is golden brown. Remove from oven, and allow to cool for about 5-10 minutes, or until safe to cut and serve.
- Garnish with balsamic glaze and fresh basil. Enjoy!
Nutrition
Have questions? Comment below and we’ll answer promptly.
Share what you made! Post a pic to Instagram and tag us @gigglingfork or with #gigglingfork. We’d love to see it!